Install and Activate Windows 11

How to Full Step byStep Guide

Looking to upgrade or perform a clean installation of Windows 11? This complete guide walks you through everything—from checking system compatibility to final activation. Learn how to create a bootable USB, configure BIOS settings, choose the best installation method, and optimize your PC after setup. Whether you’re upgrading from Windows 10 or starting fresh, this guide ensures a smooth Windows 11 installation process.

Check Windows 11 Compatibility on Your PC

Before installing Windows 11, make sure your system meets the minimum requirements. The easiest way to check compatibility is by using Microsoft’s official PC Health Check Tool.

Steps to Check Compatibility:

  1. Download the PC Health Check Tool from the Microsoft website.
  2. Install and open the tool on your computer.
  3. Click on the “Check now” button.
  4. Wait for the scan to complete.
  5. Review the results to see if your device is compatible with Windows 11.

If your PC is compatible, the tool will confirm that it can run Windows 11. If not, it will highlight which components (such as TPM, Secure Boot, or CPU) need to be upgraded.

Why Upgrade to Windows 11?

  • Faster boot times and improved performance
  • New user interface with better multitasking
  • Direct integration with Microsoft Teams
  • Enhanced security with TPM 2.0 and Secure Boot

Next Step: Create Bootable Media and Begin Installation

Once compatibility is confirmed, continue with creating a bootable USB and follow the clean installation or upgrade process. This includes configuring your BIOS, selecting installation options, and finalizing Windows 11 setup.

Final Step: Activate Windows 11

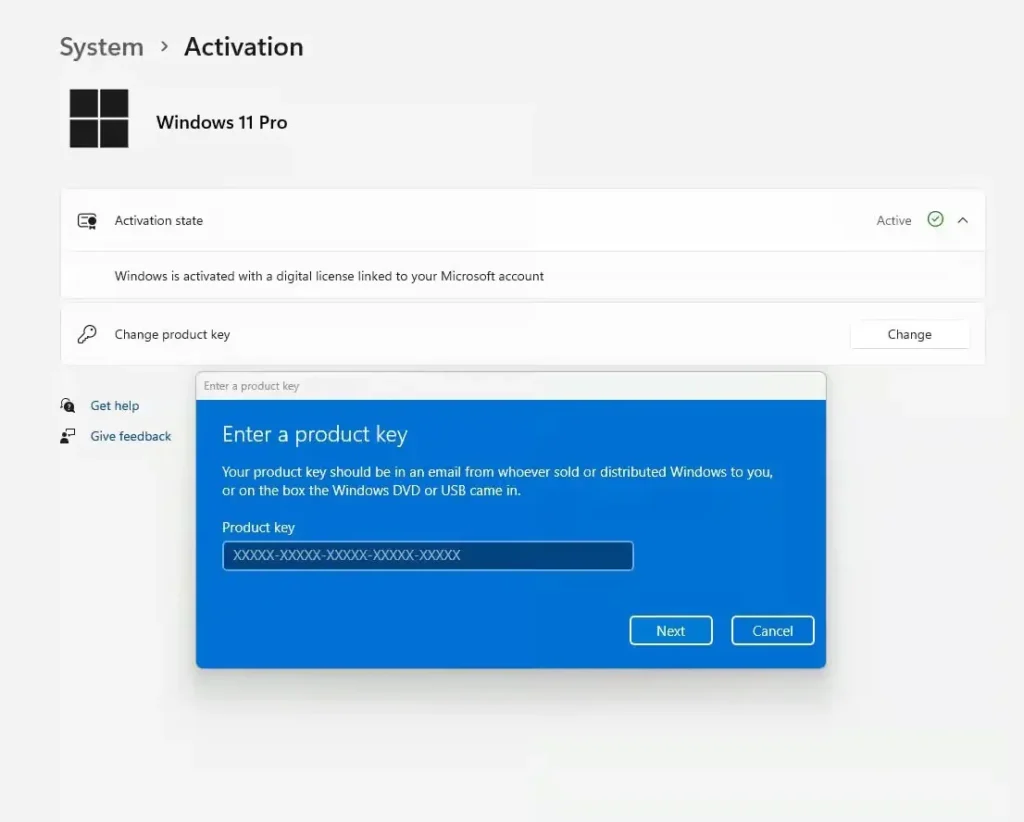
After installation, make sure to activate Windows 11 using a valid product key. You can check activation status under Settings > System > Activation.

How to Download and Install Windows 11

Installing Windows 11 is simple when you follow the right steps. Whether you’re upgrading your current system or performing a clean install, this guide will help you download and set up Windows 11 using Microsoft’s official tools.

Step-by-Step Installation Guide:

  1. Visit the Official Download Page
    Go to the Windows 11 Download Page on Microsoft’s official website.
  2. Choose Your Installation Method
    – Click “Upgrade Now” to update your current system.
    – Or select “Create Installation Media” to make a bootable USB or ISO for a fresh install.
  3. Download the Setup File
    Follow the on-screen prompts to download the necessary files for your chosen method.
  4. Run the Windows 11 Installer
    Open the downloaded file and begin the setup. Follow the installation steps carefully.
  5. Create Bootable Media (Optional)
    If you chose “Create Installation Media”, select USB flash drive or ISO file and click Next.
    – If using a USB drive, insert it and choose it from the list.
    – Wait for the tool to download and create the media.
    – Once done, click Finish.

After installation, remember to activate Windows 11 with a valid product key. For help with activation, see our activation guide.

How to Boot from USB via BIOS

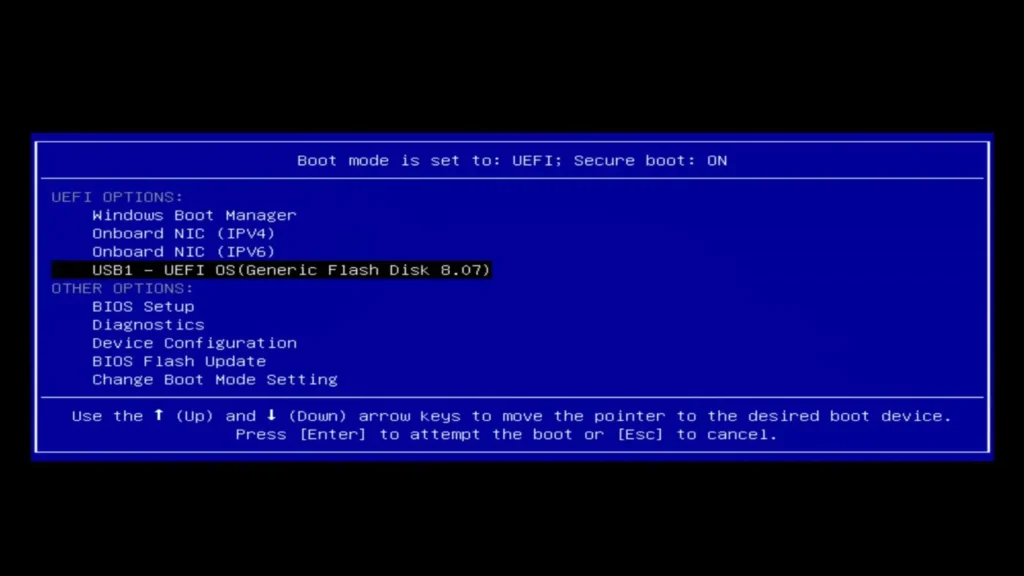
To install Windows 11 using a bootable USB drive, you’ll need to boot your PC from the USB media. This process involves accessing your BIOS or boot menu during startup.

Steps to Boot from USB:

  1. Insert the Bootable USB Drive
    Plug the USB drive into your PC before turning it on or restarting it.
  2. Restart Your PC
    Reboot the system to begin the boot process.
  3. Access the BIOS or Boot Menu
    During startup, press the appropriate key to enter the boot menu. Common keys include:
    F2
    ESC
    F12 or DEL (depends on your motherboard/brand)
    Tip: You may need to press the key multiple times quickly right after powering on.
  4. Select the USB Drive
    In the boot menu, choose the USB device as the primary boot option.
    Press Enter to confirm and begin loading the Windows 11 installer.


If your USB doesn’t appear, make sure it’s properly connected and formatted correctly using the Windows Media Creation Tool.

  •  

How to Activate Windows 11

After installing Windows 11, the final step is to activate it using a valid product key. Activation ensures your copy is genuine and unlocks full features. Follow these simple steps to activate Windows 11 Pro or Home.

Step-by-Step Activation Guide:

  1. Open Activation Settings
    Go to Settings > System > Activation.
  2. Click on “Change Product Key”
    Under the Activation section, click the “Change” button next to Change product key.
  3. Enter Your Product Key
    Type in your valid 25-character Windows 11 product key.
  4. Click “Next”
    Follow the on-screen instructions to complete the activation.

Once done, your system will be activated, and you’ll see a confirmation message. If your key is valid and your device meets licensing requirements, activation should complete instantly.

✅ Tips:

  • Make sure you’re connected to the internet before activating.
  • You can purchase a valid key from the official Microsoft Store.

Troubleshooting Windows 11 Activation Issues

If you’re facing problems while activating Windows 11, don’t worry — you’re not alone. Common issues include invalid product keys, network errors, or mismatched editions. Our expert support team is ready to help you resolve any activation-related issues quickly and efficiently.

Need Help? Contact Our 24/7 Support Team

Whether you need technical assistance or guidance through the activation process, we’re here for you anytime:

Our team is available 24/7 to ensure your Windows 11 setup and activation go smoothly — whether you’re installing a fresh copy or resolving an error.